Alucobond sheets
High-quality Alucobond sheets for durable, lightweight, and weather-resistant cladding. Perfect for façades, roofing, and modern construction projects in Kenya
Products

Alucobond sheets in Kenya
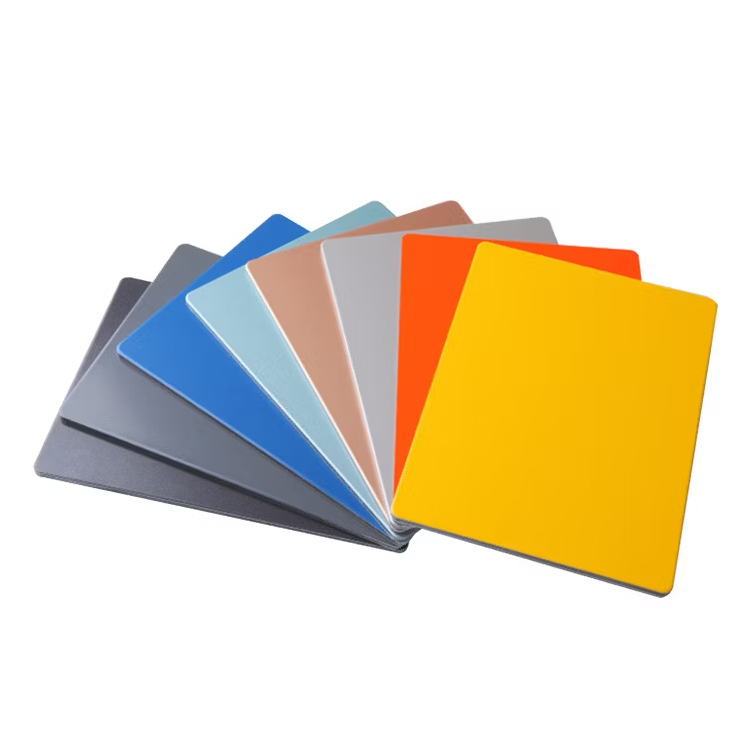
Alucobond Sheets in Kenya — Alucobond Sheets are premium aluminium composite panels (ACP) consisting of two aluminium skins bonded to a mineral or polyethylene core. In Kenya they are the leading architectural cladding material for building facades, shopfronts, corporate signage, and modern rainscreen systems requiring long-term weatherproof performance.
Alucobond sheets have become one of the most preferred exterior and interior cladding materials in Kenya due to their modern appearance, durability, and versatility. Widely used in commercial buildings, residential developments, showrooms, petrol stations, and signage, Alucobond sheets in Kenya offer a perfect balance between aesthetics, strength, and long-term performance.
As Kenyan architecture continues to evolve toward contemporary designs, developers and architects increasingly rely on aluminium composite panels (ACP) to achieve clean finishes, bold facades, and weather-resistant surfaces. Alucobond sheets are lightweight yet strong, easy to install, and available in a wide range of colours and finishes, making them ideal for both functional and decorative applications.
At Burhani Hardware Dealers (BHD), we supply high-quality Alucobond sheets suitable for Kenya’s climate, ensuring excellent resistance to heat, moisture, and UV exposure. With competitive pricing, expert guidance, and reliable nationwide delivery, BHD is your trusted supplier of premium building materials in Kenya.
Alucobond Sheets in Kenya – Overview & Specifications
Alucobond sheets, also known as aluminium composite panels, consist of two aluminium sheets bonded to a non-aluminium core. This construction provides exceptional rigidity while keeping the panels lightweight and easy to handle. Their smooth surface and consistent thickness make them suitable for precise architectural and fabrication work.
Key features of Alucobond sheets include:
-
Lightweight yet high-strength structure
-
Excellent flatness and surface finish
-
Resistance to corrosion, moisture, and UV rays
-
Easy cutting, bending, and installation
-
Compatibility with modern fixing systems
Alucobond sheets are commonly used alongside other construction materials such as steel structural sections, framing systems, and support frameworks to create durable and visually striking facades. Their versatility allows them to be applied in both exterior and interior environments without compromising performance.
Available in multiple thicknesses and finishes, Alucobond sheets can be customized to meet specific design and functional requirements for projects across Kenya.
Uses of Alucobond Sheets in Construction & Design
Building Facades & Exterior Cladding
One of the most common uses of Alucobond sheets in Kenya is exterior cladding. They provide a sleek, modern appearance while protecting buildings from harsh weather conditions. Their resistance to fading and corrosion makes them ideal for long-term exterior use in urban and coastal environments.
Interior Wall Panels & Ceiling Finishes
Alucobond sheets are increasingly used for interior applications such as wall paneling, column cladding, and ceiling designs. Their smooth finish and wide colour selection allow architects and designers to create contemporary interiors for offices, malls, hotels, and residential spaces.
Signage, Branding & Shop Fronts
Due to their flatness and ease of fabrication, Alucobond sheets are widely used in signage, billboards, and shopfront branding. They provide an excellent surface for printing, vinyl application, and illuminated signage, making them popular among advertising and branding professionals.
Petrol Stations, Showrooms & Commercial Spaces
Petrol stations, car showrooms, banks, and retail outlets frequently use Alucobond sheets to achieve a professional, high-end look. The material’s durability ensures minimal maintenance while maintaining a clean and attractive appearance over time.
Cost of Alucobond Sheets in Kenya
The price of Alucobond sheets in Kenya depends on several factors, and understanding these helps buyers make informed decisions when budgeting for their projects.
Factors Affecting Alucobond Sheet Prices
Panel Thickness
Thicker panels generally cost more due to higher material content and improved rigidity.
Finish & Colour
Special finishes such as metallic, mirror, wood grain, or custom colours may attract higher pricing compared to standard finishes.
Supplier Quality
Reputable suppliers like BHD ensure genuine, high-quality panels with consistent thickness, strong bonding, and reliable performance, offering better value in the long run.
When comparing prices, it is important to consider durability, warranty, and suitability for Kenyan environmental conditions rather than focusing on cost alone.
Alucobond Sheets vs Other Cladding Materials
Compared to materials such as timber cladding, concrete finishes, or traditional metal sheets, Alucobond offers superior flatness, modern aesthetics, and lower maintenance. For insights into material comparisons, explore our guide on steel vs timber vs concrete in Kenya, which highlights performance differences in construction materials.
Durability & Performance of Alucobond Sheets
Weather & UV Resistance
Alucobond sheets are designed to withstand prolonged exposure to sunlight, rain, and temperature variations. Their protective coatings help prevent fading, corrosion, and surface degradation, making them suitable for Kenya’s diverse climate zones.
Structural Stability & Safety
Despite being lightweight, Alucobond sheets offer excellent rigidity and dimensional stability when properly installed on suitable frameworks. This makes them reliable for both high-rise buildings and large commercial facades.
Low Maintenance & Long-Term Value
One of the major advantages of Alucobond sheets is their low maintenance requirement. Simple cleaning is usually sufficient to maintain their appearance, contributing to long-term cost savings for property owners and developers.
Choosing the Right Alucobond Sheets for Your Project
Residential Applications
For homes and apartments, Alucobond sheets are ideal for exterior accents, balconies, boundary walls, and interior feature walls. Their modern look enhances property value while ensuring durability.
Commercial & Industrial Projects
Commercial buildings require materials that combine aesthetics with performance. Alucobond sheets meet these demands, especially when paired with strong support systems and quality installation.
Architectural & Design Considerations
Architects often select Alucobond sheets for their flexibility in design, colour consistency, and ability to achieve clean, contemporary finishes. Choosing the right thickness and finish ensures both visual appeal and structural reliability.
Why Buy Alucobond Sheets from BHD?
Wide Selection & Trusted Quality
BHD supplies premium Alucobond sheets in Kenya, available in various colours, finishes, and specifications to suit different applications. Our products are sourced to meet industry standards and deliver reliable performance.
Trusted by Builders & Designers Nationwide
From contractors and developers to architects and signage professionals, BHD is trusted across Kenya for quality building materials. Our experience and commitment to customer satisfaction set us apart in the market.
Reliable Delivery & Expert Support
We offer fast delivery and knowledgeable support to help you select the right Alucobond sheets for your project. Learn more about our company on our About Us page or find quick answers on our Frequently Asked Questions page.
Order Alucobond Sheets in Kenya – Nationwide Delivery
At BHD, we make it easy to source Alucobond sheets for projects of any size. We offer same-day delivery within Nairobi and next-day delivery across Kenya, ensuring timely supply for construction and installation schedules.
Whether your project is in Nairobi, Mombasa, Kisumu, Nakuru, Eldoret, Thika, or surrounding areas, BHD delivers quality materials you can rely on.
Get Alucobond Sheets from BHD Today
Burhani Hardware Dealers (BHD)
burhanihardwaredealers [at] yahoo.com
+254 731 217 462 | +254 704 606 131
Industrial Area, Funzi Road, Nairobi
Need Alucobond sheets?
Contact us for pricing, specifications, and delivery options across Kenya.