Perspex Sheets
High-quality perspex sheets for durable, transparent, and versatile applications. Ideal for signage, partitions, displays, and modern construction projects
Products

Perspex Sheets
Perspex Sheets — Perspex Sheets are premium cast-acrylic panels offering glass-like optical clarity, easy fabrication, and excellent weather resistance. In Kenya they are widely used for signage, light boxes, display cases, sneeze guards, decorative glazing, and architectural features where aesthetics and cost-effective transparency matter.
Perspex Sheets in Kenya
Perspex sheets, also known as acrylic sheets, are among the most versatile and widely used plastic materials in Kenya’s construction, signage, and interior design industries. Valued for their clarity, strength, and lightweight nature, Perspex sheets in Kenya are commonly used as a durable alternative to glass in both residential and commercial applications.
With the growing demand for modern, safe, and visually appealing materials, Perspex sheets have become a preferred choice for architects, fabricators, business owners, and homeowners. They offer excellent transparency, weather resistance, and ease of fabrication, making them suitable for a wide range of indoor and outdoor uses.
At Burhani Hardware Dealers (BHD), we supply high-quality Perspex sheets that meet professional standards for durability, clarity, and performance. With competitive pricing and reliable nationwide delivery, BHD is a trusted supplier of Perspex sheets and building materials across Kenya.
Perspex Sheets in Kenya – Overview & Specifications
Perspex sheets are manufactured from acrylic, a strong thermoplastic material known for its optical clarity and impact resistance. Compared to traditional glass, Perspex is significantly lighter and less prone to shattering, making it safer and easier to handle during installation.
Key features of Perspex sheets include:
-
High transparency and light transmission
-
Lightweight and impact-resistant
-
Easy cutting, drilling, bending, and polishing
-
UV-resistant options for outdoor use
-
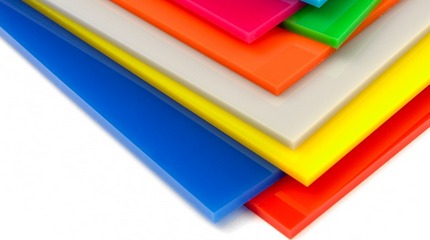
Available in clear, frosted, coloured, and textured finishes
Perspex sheets are compatible with various fixing and framing systems and can be used alongside materials such as aluminium profiles, steel frames, and support structures. Their consistent thickness and smooth surface make them suitable for precision fabrication and clean installations.
Available in multiple thicknesses and colours, Perspex sheets can be selected to suit both functional requirements and design preferences.
Uses of Perspex Sheets in Construction & Design
Windows, Partitions & Protective Screens
One of the most common uses of Perspex sheets in Kenya is for interior partitions, protective screens, and window panels. They are widely used in offices, banks, hospitals, schools, and retail spaces where visibility and safety are required.
Signage, Displays & Advertising
Perspex sheets are highly popular in signage and advertising due to their clarity, smooth surface, and ease of branding. They are used for:
-
Shop signage and lightboxes
-
Display stands and showcases
-
Directional and safety signs
Their ability to be cut into precise shapes makes them ideal for custom branding applications.
Roofing, Skylights & Canopies
UV-stabilized Perspex sheets are used in skylights, canopies, and covered walkways. They allow natural light to pass through while offering protection from wind and rain, making them suitable for both residential and commercial properties.
Furniture, Interior Design & Decorative Applications
Interior designers frequently use Perspex sheets for modern furniture, shelving, table tops, and decorative panels. Their sleek appearance and variety of colours make them suitable for contemporary interiors.
Cost of Perspex Sheets in Kenya
The price of Perspex sheets in Kenya varies depending on specifications and intended application. Understanding the key pricing factors helps buyers choose the right product for their needs.
Factors Affecting Perspex Sheet Prices
Thickness of the Sheet
Thicker Perspex sheets cost more due to increased material strength and durability.
Colour & Finish
Clear sheets are generally more affordable, while frosted, coloured, or specialty finishes may be priced higher.
UV Protection & Quality
Outdoor-grade, UV-resistant Perspex sheets typically cost more but offer better long-term performance under sunlight exposure.
Perspex Sheets vs Glass
Compared to glass, Perspex sheets are lighter, safer, and easier to fabricate. While glass can scratch less easily, Perspex offers better impact resistance and flexibility, making it a preferred choice in many Kenyan applications.
Durability & Performance of Perspex Sheets
Impact Resistance & Safety
Perspex sheets are far more impact-resistant than glass, reducing the risk of breakage and injury. This makes them ideal for high-traffic areas and public spaces.
Weather & UV Resistance
High-quality Perspex sheets perform well under Kenya’s climatic conditions, especially UV-stabilized variants designed for outdoor use. They resist yellowing and maintain clarity over time when properly maintained.
Maintenance & Longevity
Perspex sheets require minimal maintenance. Regular cleaning with appropriate materials helps preserve clarity and appearance, ensuring long-term value for both residential and commercial installations.
Choosing the Right Perspex Sheets for Your Project
Residential Applications
Homeowners use Perspex sheets for windows, balcony enclosures, skylights, and interior partitions. They offer a modern look while enhancing safety and light transmission.
Commercial & Industrial Projects
Commercial buildings benefit from Perspex sheets in signage, office partitions, display units, and protective barriers. Selecting the correct thickness ensures durability and compliance with project requirements.
Design & Aesthetic Considerations
Colour, transparency, and finish play a key role in achieving the desired design outcome. Clear sheets maximize light, while frosted or coloured sheets add privacy and visual interest.
Why Buy Perspex Sheets from BHD?
Wide Range & Reliable Quality
BHD supplies premium Perspex sheets in Kenya in various thicknesses, colours, and finishes to suit different applications. All products are sourced to meet quality and performance standards.
Trusted by Professionals Nationwide
Contractors, fabricators, designers, and business owners across Kenya trust BHD for consistent quality and dependable service. Our experience ensures you receive the right material for your project.
Expert Support & Fast Delivery
Our team provides professional guidance on selecting Perspex sheets, thickness options, and installation suitability. Learn more about our company on our About Us page or visit our Frequently Asked Questions page for quick answers.
Order Perspex Sheets in Kenya – Nationwide Delivery
BHD offers same-day delivery within Nairobi and next-day delivery across Kenya, ensuring fast and reliable supply for your projects. Whether you are working in Nairobi, Mombasa, Kisumu, Nakuru, Eldoret, Thika, or nearby towns, we deliver Perspex sheets nationwide.
You can check availability, request quotations, or place orders directly through our team for a smooth and efficient purchasing experience.
Get Perspex Sheets from BHD Today
Burhani Hardware Dealers (BHD)
burhanihardwaredealers [at] yahoo.com
+254 731 217 462 | +254 704 606 131
Industrial Area, Funzi Road, Nairobi
Need Perspex Sheets?
Contact us for pricing, specifications, and delivery options across Kenya.